Share

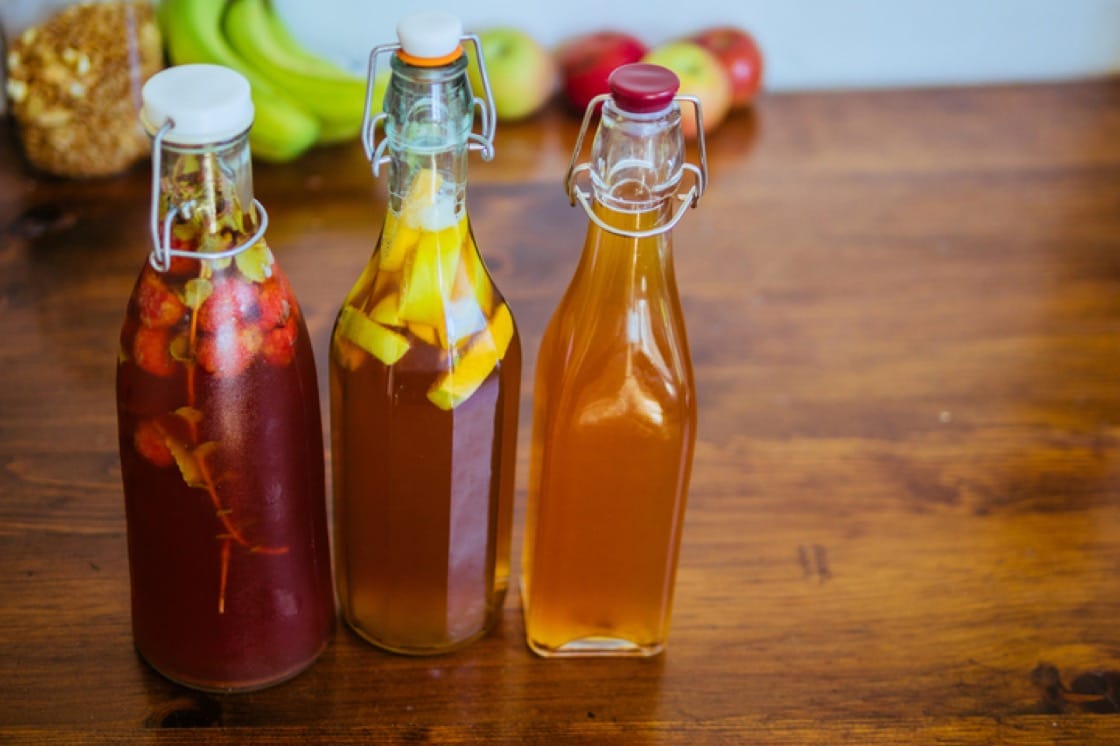
Now found in hipster cafes and gourmet supermarkets everywhere, this fizzy, fermented tea is popular as a health drink and as a delicious alternative to processed soda. But why shell out $5 for a bottle when you can make kombucha at home for a fraction of the cost?

Kombucha is made by fermenting sweetened tea with a gelatinous pancake-like substance called a Scoby, or symbiotic colony of bacteria and yeast, in an open vessel at room temperature for one to three weeks. The kombucha is then bottled for about a week to contain the released carbon dioxide and induce carbonation in the liquid. Refrigerating the bottled kombucha stops the fermentation and carbonation.
As the fermentation process occurs, more Scoby grows on the surface of the tea, so to start, you can obtain one from a fellow home brewer or purchase one from health food stores in Singapore like Bushwick.
Health Benefits Of Kombucha
Studies conducted suggest that although the purported health benefits of kombucha are occasionally exaggerated by the media and anecdotal human studies, kombucha’s tea base and fermentation process imparts to the beverage similar benefits as plain tea and fermented foods. These include probiotics that encourage gut bacteria diversity and aid digestion, as well as antioxidant properties.

Home-made Kombucha
Makes 1 litre
For First Fermentation
1 wide-mouth glass jar (larger than 1 litre capacity)
Tight-weave cloth, coffee filter paper or kitchen towels
Rubber band
4-5 teabags of black or green tea
1 litre tap water
50g white sugar
25g Scoby
200ml of starter kombucha
For Second Fermentation
Funnel
Glass bottles with airtight cap
Optional flavourings: Small pieces of fruit, like berries, apple or pear, or sliced ginger
Method
1. Brew 1 litre of tea with sugar and let it cool to room temperature. High temperatures will kill the Scoby.
2. Sterilise the wide-mouth glass jar by boiling it in hot water for 10 minutes.
3. Pour the cooled tea into the wide-mouth glass jar and add the Scoby and starter tea.
4. Cover the mouth of the jar with cloth or paper towels and secure with rubber band. Store on kitchen countertop with good air-flow, away from direct sunlight, ideally between 21 to 29°C.
5. After 3-5 days, a baby Scoby will start to form on the surface of the kombucha. Taste-test the kombucha by drawing out some liquid with a straw and finger. The longer the kombucha ferments, the less sweet and more acidic it will be.
6. After 7-9 days, or once the kombucha reaches your preferred acidity, strain out the kombucha into bottles, reserving the Scoby and a cup of the mature kombucha for the next batch. Start a second batch from Step 1.
7. The bottled kombucha can be refrigerated and consumed immediately. At this stage, the kombucha will not be effervescent. To induce carbonation and add flavourings, proceed to second fermentation.
1. Strain the matured kombucha through a coffee filter to remove dead yeast strands.
2. Fill an air-tight bottle with the filtered kombucha and any optional flavourings, leaving about 2.5cm of air space on top.
3. Close the bottle tightly and let it continue to ferment on the kitchen counter until it reaches the level of carbonation you desire. This could take 3 to 7 days. Check the level of carbonation carefully over the sink each day and be careful of explosions, or use a soft plastic bottle till you are more familiar with how fast carbonation occurs.
4. Refrigerating the carbonated kombucha stops further fermentation and the fizzy kombucha is now ready for consumption.

Recipe Notes:
- A Scoby is a living home for active yeast and bacteria and can be killed by extreme temperatures, so never pour hot tea on it or store it in the fridge.
- To prevent mould and undesirable microorganisms from growing, look out for three things: Always wash your hands with soap and sterilise your jars before coming into contact with the Scoby. Keep an acidic environment by making sure to use enough starter tea when you brew a new batch of kombucha (at least 1:5 ratio of starter to fresh sweet tea). Only use white cane sugar and black or green tea to maintain low pH levels (flavoured teas contain oils encourage mould).
- Mould can be distinguished from healthy Scoby by its colour and texture — healthy Scoby can have white or brown moist-looking spots, while mould is often green, black or blue and have a furry or fuzzy texture. Throw the brew and Scoby away and start over with fresh Scoby.